Recording a Flutter App with JMeter + Charles Proxy

As a tester, you might get stuck when asked to do performance testing of a Flutter app—especially if you're not given API endpoints and are expected to record traffic directly from the frontend UI. The usual method of using JMeter's HTTP(S) Test Script Recorder doesn't work because JMeter alone can’t capture traffic from Flutter apps easily. Don’t worry! Today, we’re here with a solution just for testers like you. With the help of Charles Proxy sitting in the middle, we’ll show you how to record and replay that traffic in JMeter. Let’s begin and get it done in the next 5 to 10 minutes!
Table of Contents
- Prerequisites
- Install & configure Charles
- Install the Charles root certificate on Android / iOS
- Make your Flutter app proxy-aware
- Set up JMeter’s HTTP(S) Recorder
- Chain Charles → JMeter (up-stream proxy)
- Record, verify & export
- Optional — convert a HAR/CHLS session to JMeter
- Troubleshooting & FAQ
1 Prerequisites
- Apache JMeter 5.6+ installed on your desktop machine.
- Charles Proxy (v4.6+ recommended).
- An Android emulator/device or iOS simulator/device running your Flutter build.
- Desktop and device must be on the same Wi-Fi or routed network.
2 Install & configure Charles (macOS & Windows)
-
Install Charles:
- macOS: Use Homebrew or download from the official site.
brew install --cask charles - Windows: Download the .exe installer from the Charles website and run it as administrator.

- macOS: Use Homebrew or download from the official site.
-
Configure proxy settings:
Go to Proxy ▸ Proxy Settings and confirm Charles is listening on port8888.
-
Enable SSL Proxying:
Go to Proxy ▸ SSL Proxying Settings and add `*:*` as location.
This ensures Charles decrypts all SSL/TLS traffic.
3 Install the Charles root certificate on the device
Charles generates a unique root CA (charles-proxy-ca.pem). You need your device/emulator to
trust that CA so TLS handshakes succeed.
iOS Simulator / Device
- On the simulator, simply visit
https://chls.pro/sslin Safari and accept the profile (Settings ▸ General ▸ About ▸ Certificate Trust Settings → enable).
Android 7 +
- Open Help ▸ SSL Proxying ▸ Save Charles Root Certificate and save it as
charles.pem. - Push it to
/sdcard/Downloadand install it (Settings ▸ Security ▸ Encryption & credentials ▸ Install from storage). - Add a
network_security_config.xmlfile that tells your debug build to trust user CAs:
<network-security-config>
  <base-config cleartextTrafficPermitted="true">
    <trust-anchors>
      <certificates src="system"/>
      <certificates src="user"/>
    </trust-anchors>
  </base-config>
</network-security-config>
Add android:networkSecurityConfig="@xml/network_security_config" in AndroidManifest.xml.:contentReference[oaicite:2]{index=2}
4 Make your Flutter app proxy-aware (Perform this step when your charle proxy doesn't record your traffic)
Flutter (Dart) ignores the system proxy, so you must inject it manually. The simplest approach is
to read the proxy from the environment and override HttpClient.findProxy:
/// pubspec.yaml
dependencies:
  http: ^1.2.1
  system_proxy: ^0.2.2
import 'dart:io';
import 'package:system_proxy/system_proxy.dart';

class ProxiedHttpOverrides extends HttpOverrides {
  final String host;
  final String port;
  ProxiedHttpOverrides(this.host, this.port);

  @override
  HttpClient createHttpClient(SecurityContext? context) {
    return super.createHttpClient(context)
      ..findProxy = (_) => 'PROXY $host:$port'
      ..badCertificateCallback = (cert, host, port) => true; // trust Charles CA
  }
}

Future<void> main() async {
  WidgetsFlutterBinding.ensureInitialized();
  final proxy = await SystemProxy.getProxySettings();
  if (proxy != null) {
    HttpOverrides.global =
        ProxiedHttpOverrides(proxy['host']!, proxy['port']!);
  }
  runApp(const MyApp());
}
Now every HTTP call made with http, dio, gRPC, etc., obeys the proxy.:contentReference[oaicite:3]{index=3}
5 Set up JMeter’s HTTP(S) Test Script Recorder
- Start JMeter and add
Test Plan ▸ Add ▸ Non-Test Elements ▸ HTTP(S) Test Script Recorder. The default port is8889– leave it or pick another free port.:contentReference[oaicite:4]{index=4} - Under Target Controller, point to where you want recorded samplers to land (e.g. a dedicated Recording Controller).
- Click Start. JMeter creates
ApacheJMeterTemporaryRootCA.crtin thebinfolder.
6 Chain Charles → JMeter (up-stream proxy)
We want traffic to flow:
Flutter App ► Charles Proxy (8888) ► JMeter Recorder (8889) ► Internet
- In Charles: Proxy ▸ External Proxy Settings.
Enable HTTP and set hostname to your desktop’s IP, port to JMeter’s recorder port (8889).:contentReference[oaicite:5]{index=5} - Restart recording in both tools.
7 Record & verify
- Launch your Flutter app and exercise an end-to-end flow.
- In Charles you should see each request; in JMeter, matching samplers appear under the Recording Controller.
- Stop recording, tidy up (remove third-party analytics calls, etc.), add assertions and thread groups, then save the plan.
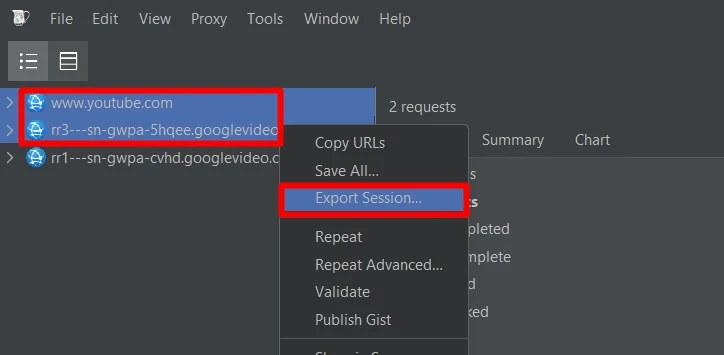
8 Optional — convert a HAR / CHLS session to JMeter
If chaining feels fiddly, you can:
- File ▸ Export Session ▸ HAR (HTTP Archive) in Charles.
- Upload the HAR to the BlazeMeter HAR-to-JMX converter or
use
jmeter-har-readeron the CLI to spit out a ready-to-run.jmx.

9 Troubleshooting | FAQ
- No traffic in JMeter: double-check the External Proxy field in Charles and that the JMeter recorder is Started.
- Flutter app throws CERT errors: ensure
badCertificateCallbackreturnstrue(Dart trusts Charles’ self-signed cert) and that the Android network security config includes<certificates src="user"/>. - Large uploads stall: bump
jmeter.properties ▸ proxy.transmit.bufferto1-2 MB. - Need to record multiple devices concurrently: give each device its own Charles
port and spin up matching JMeter recorders on different ports (e.g.
8890, 8891…).


0 Comments